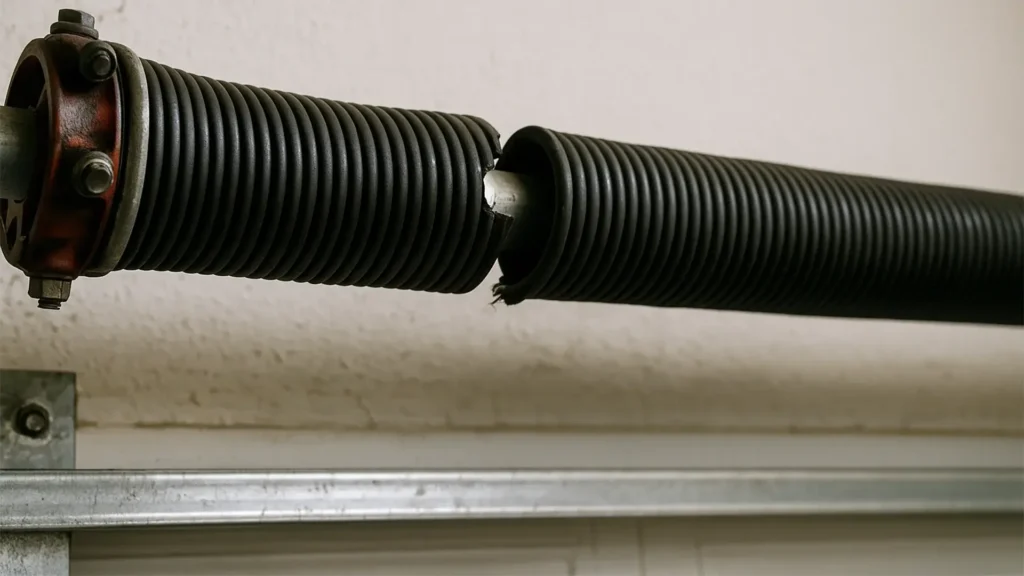
An average garage door weighs around 150-200 lbs. And to lift and close the garage door, you should credit its springs located on the top.
But what if the springs go bad? Unfortunately, you might be dealing with this. But tell you one thing, this happens. So, we’ll cover how to fix a garage fix a garage door spring today.
Most importantly, NEVER ignore a garage door with faulty springs—it’s a disaster waiting to happen. One sudden snap could send heavy metal crashing down, risking serious injury or worse.
Don’t panic—you don’t need to call a pro just yet! We’re here with some DIY fix, step by step, so you can fix it safely and confidently.
When Is It Time to Fix Your Garage Door Spring?
It is important to understand when you should replace your garage door springs. Logically, you are supposed to fix the springs when they malfunction. But how do you know what?
Skip to the following section if you are already aware of this.
As you know, the role of a garage door spring is to help you lift and close the door easily. And so, you find it hard to operate the door; perhaps something is wrong with it.
You may hear creaking, squeaking, or loud sounds when you open or close the door. Or, the door might take a long time to operate. Sometimes, the garage door opens unevenly. You may also notice cracks on the springs. Visible damage such as rust, elongation, and broken coils tells you it’s time to fix the spring.

Now, the garage door can malfunction for several reasons. If you ask, “Why does my garage door spring squeak?” Well, more often than not, the culprit is worn-out springs! Over time, those trusty coils lose spring tension, leading to annoying noises—and sometimes even bigger headaches.
How to Fix a Garage Door Spring?

We assume you have the torsion or roller door spring in your garage. Now, before getting started, make sure you have some tools and equipment. What you need in this case are;
- Step ladder.
- Winding bars.
- Wrench.
- Gloves.
- Eye protection.
- C-clamp or locking pliers.
- Replacement springs.
- Lubricant.
- Cardboard or paper bag.
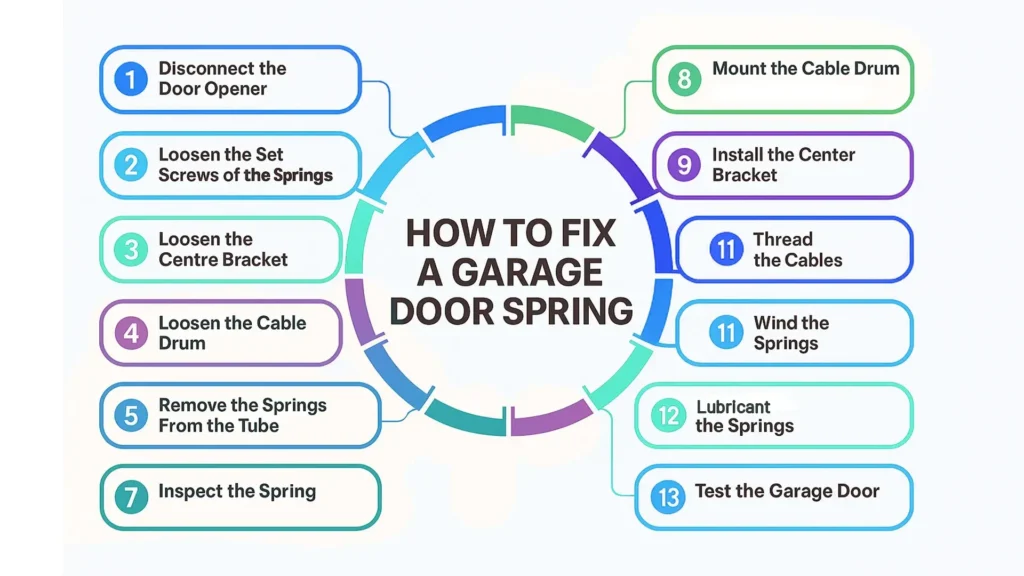
Step 1: Disconnect the Door Opener
Before fixing any garage door issue, it is important to disconnect the door opener. Unplug the power cord connected to the garage door opener and, if applicable, disconnect the backup battery to ensure complete power isolation.
Next, you need to disconnect the door opener by pulling the operator emergency release. This reduces the chance of the door accidentally opening.
Tips: Put a C-clamp into the door track to keep it from opening.
Step 2: Loosen the Set Screws of the Springs
Place a step ladder where you can comfortably access the springs. First, you need to loosen the torsion spring set screws. Here, you need to use a wrench and a winding bar. Make sure to use winding bars certified for garage door systems.
Take your bar and put it into the bottom hole. Slowly loosen the screws one by one with the wrench. Remember to keep a firm grip on the bar. Once you loosen the screw, slowly unwind the spring a bit. Then, put the second bar into the next hole and loosen another screw.
Remember, an average spring has thirty quarter turns, so you need to unwind it possibly thirty times.
Step 3: Loosen the Centre Bracket
In a conventional two-spring garage door, the springs are joined by the center bracket. And in order to access the springs, you also need to remove the nuts and bolts of the center bracket carefully.
So, position your step ladder in the direction of the center bracket. Next, use a 9.16 wrench or a power tool to remove the bolts. This will disconnect the two springs.
Step 4: Loosen the Cable Drum
To remove the springs from the tube, you need to loosen the cable drum. Then, you need to take the wrench and carefully remove all the screws on the drum. Once you are done with one side, move on to the other part of the spring tube. You need to remove the drum.
Step 5: Remove the Springs From the Tube
Now you have to slide the springs down each end to separate them from the tube. Make sure to slide off the springs gently.
Step 6: Inspect the Spring
If the entire spring is broken or cracked, you need to replace both springs with a new one. But be careful choosing the right springs. You have to measure the length and diameter of the old team so that you can make the new one similar to that. So, better to precisely check both springs.
Step 7: Install the New Spring
Similar to removing the old spring, you need to carefully slide the spring onto the tube and position it properly in the middle. Make sure this stationary cone faces the center bracket.
You can also install a new garage door springs safely by Upstate doors expert team.
Step 8: Mount the Cable Drum
Here, you have to mount the cable drum to the bracket with the wrench. Do this for both sides of the tube.
Step 9: Install the Center Bracket
You need to slide both the left and right springs to the center bracket and attach the stationary cones. Then, take the original bolts and put them in place again with the help of the wrench.
Step 10: Thread the Cables
Before that, you need to place the C-clamp on the tube so that when you thread the cables on the drum, the tube doesn’t rotate. You’ll find a little squash on the drum and where you need to put your cable. Then, you have to thread the cable on the drum gently. Make sure to do the same for both sides.
Step 11: Wind the Springs
Opposite to how you unwind the springs, you now need to wind them using the winding bars and hammer. Put the bar on the spring hole and then push it up. Insert the next bar and pull out the first. You need to continue doing so until the right torsion is there.
Remember how it took around 30 times to unwind the springs? This means you need around 31 turns to wind the springs properly. Put the set screws in place, then tighten them with a wrench.
Here’s a quick reference chart for the spring turns-
| Door Height | Typical Torsion Spring Turns |
| 7 ft | 30–32 quarter turns |
| 8 ft | 34–36 quarter turns |
Step 12: Lubricant the Springs
This is one of the most important steps, but most people often overlook it. Once the springs are in the perfect shape, you need to apply lubricant. But make sure you place a cardboard or grocery bag behind the springs while doing so. Then, gently spray the lubricant and wipe off any excess.
Step 13: Test the Garage Door
In this step, you must connect the door opener and plug in the power cord. After that, inspect the door operation. Manually lift the door 2 or 3 feet above to test whether it is in perfect balance.
You are all done. Now, you can claim that you know how to fix a roller door spring, too.
Conclusion
If the springs of your garage door need fixing, you should never delay dealing with the issue. Now, it’s up to you.
You can DIY as now you know the steps to how to fix a garage door spring if you have the tools and basic expertise to get the job done. Besides, emergencies professional help can also be called to fix the issue safely and efficiently, ensuring long-term reliability.
FAQs
What Is the Best Lubricant for Garage Springs?
Applying lubricant on garage door at least once a year is a great idea to keep your garage door operating smoothly. But make sure you choose the right lubricant. You can go with the White Lithium Grease, which is nice and thick and will stay in place for a long time. Also, avoid WD-40 or oil-based lubricants
How to Open a Garage Door With a Broken Spring?
Opening a garage door with a broken spring is not a good move. But if you have to, first disengage the opener. Then, as soon as you lift the door manually, make sure to place a C-clamp on the track to prevent an uneven drop of the door. Try to get assistance from others.
How Do I Make My Spring Less Squeaky?
The best thing you can do is apply the right lubricant to your garage door springs. While spraying the springs, focus on the coil more. Also, regular maintenance of the springs is needed to avoid issues like squeaky noise from the component. Tightening the loose hardware will also help.
How Do You Wind a Garage Door Spring?
To wind your garage door springs, you need to use winding bars. Put one bar onto the springs’ hole and gently turn it. Next, pull out the first one, put the second one into the hole, and make a turn. You may need to turn the bars 30 times.


