
Have you ever rushed out the door, pressed your garage remote, and nothing happened? That little delay can feel frustrating. Most of the time, the problem is just a dead battery.
To change a battery in a garage door opener, open the remote’s battery compartment, remove the old battery, and insert a new one of the same type. Close the cover securely and test the remote to ensure it works.
This easy-to-follow guide on how to change a battery in a garage door opener makes the process quick and hassle-free. Whether you’re a first-time DIYer or have experience, you’ll have your garage door remote working again in just minutes.
Key Takeaways
- If your garage door remote suddenly stops working, don’t panic. Most of the time, swapping out the old battery for a new one gets things running again in minutes.
- A fresh battery, a screwdriver, and a stepladder are usually all you need. Preparing these in advance saves you time and makes the process smooth and safe.
- If replacing it doesn’t solve the issue, the trouble could be with sensors, wiring, or worn parts. In that case, calling a professional keeps your garage door safe and reliable.
Signs the Garage Door Opener Needs a New Battery
Before you grab a new battery, it helps to know the warning signs. Sometimes the problem is not the garage door itself but the small battery inside the remote.
If your door works one moment and refuses the next, that is a clear clue. You might also notice the remote only works when you are very close to the garage instead of from the street like before.
Check the LED light on your remote. A dim or flickering light usually means the battery is running low.
If you find yourself pressing the button over and over just to get the door to move, that is another sign.
And of course, the clearest sign is when the remote stops working completely.
Many homeowners ignore these signs, thinking something more serious is wrong, when a simple battery change is all it takes.
Tools and Materials for Replacing a Battery in a Garage Door Opener
Before you start, it’s a good idea to gather everything you’ll need. Having the right tools makes the job faster, safer, and way less frustrating.
Replacement Battery
Always pick the battery recommended by your garage door opener’s manufacturer. Using the wrong one can cause the remote to malfunction or even damage the device. Check your user manual or the label on your opener to be sure.
Screwdriver or Drill
You’ll need a screwdriver or drill to open the battery cover. Make sure the size fits the screws, so you don’t strip them or cause unnecessary frustration.
Step Ladder
If your opener is on the ceiling, a sturdy ladder will help you reach it safely. Place it on a flat surface to avoid slips, and never rush while climbing.
Gloves
Gloves protect your hands and prevent you from touching the battery terminals directly. They also help reduce the risk of static electricity affecting the opener’s electronics.
Flashlight
If your garage isn’t well-lit, a flashlight is a lifesaver. It lets you see clearly inside the battery compartment, so you can work carefully and avoid mistakes.
Steps to Change a Battery in a Garage Door Opener

Ever pressed your garage door remote only to find it dead at the worst possible moment? It’s frustrating, especially when you’re rushing out the door. Most of the time, a simple battery replacement solves the problem.
Let’s walk through each step that helps you swap the battery safely and get your garage door working smoothly again.
Step 1: Stay Safe and Prepare Your Area
Before touching anything, make sure you protect yourself. Close the garage door completely and either unplug the opener or turn off its circuit breaker. This prevents any chance of electric shock.
Set up a sturdy step ladder so you can reach the battery compartment safely. Having a clear, well-lit workspace makes the process smoother and safer.
Step 2: Identify Your Opener Type
Check whether you have a handheld remote, a wall-mounted control, or a key fob. Knowing the type helps you choose the right battery and locate the compartment quickly.
Step 3: Open the Battery Compartment
Look for the panel, clip, or screw that secures the battery cover. Some remotes slide open while others require a small screw. Wall-mounted units may have a snap-on panel or screws. Open it carefully to avoid damage.
Step 4: Select the Correct Battery
Examine the old battery to determine its size and voltage. Many remotes use CR2032 or 9V batteries. Pick a reliable brand to make sure your opener works consistently and lasts longer.
Step 5: Remove the Old Battery
Take out the old battery carefully. Note its orientation, paying attention to the positive and negative sides. This ensures you insert the new one correctly.
Step 6: Insert the New Battery
Slide the new battery in the same way as the old one. Make sure the contacts touch properly to guarantee the remote works correctly.
Step 7: Close and Secure the Compartment
Replace the cover and tighten any screws snugly. Avoid overtightening to prevent damage to the threads or cover.
Step 8: Test the Remote
Press the buttons to open and close your garage door. If it responds smoothly, you’ve successfully changed the battery.
How to Maintain Your Garage Door Opener Battery
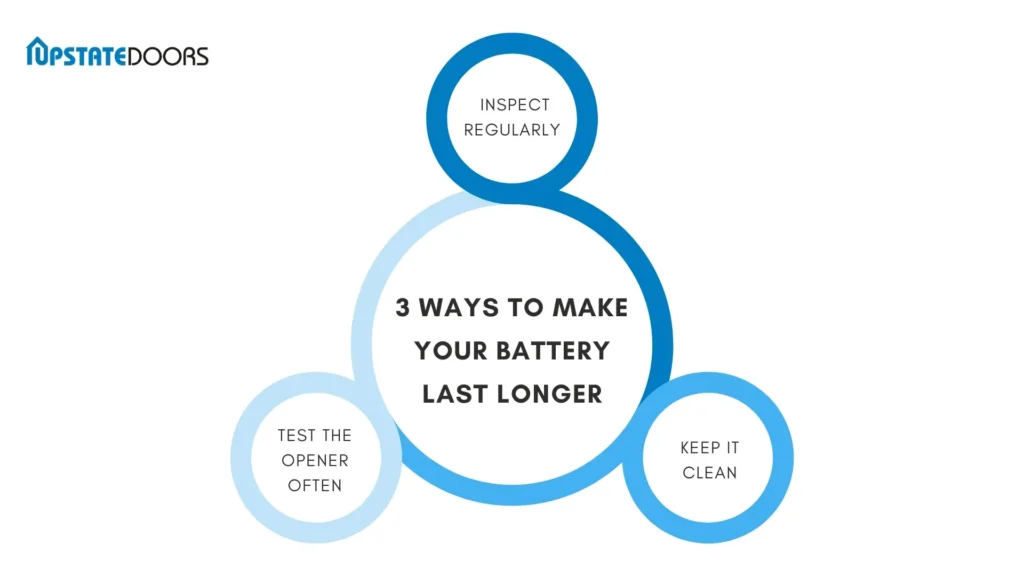
Your garage door opener works hard every day, and the battery is a big part of that. A little care goes a long way in keeping it reliable. Here are some simple ways to make your battery last longer.
1. Inspect Regularly
Take a quick look at your opener battery every few months. Watch for rust, leaks, or any signs of wear. Spotting problems early can save you from a dead battery when you need it most.
2. Test the Opener Often
Don’t wait until the door stops working to check the battery. Press the button and see how the opener responds. If it moves slowly or feels inconsistent, the battery may be running low.
3. Keep It Clean
Dust and dirt love to settle on garage door openers. Wipe the unit with a dry cloth now and then. A clean opener runs more smoothly and helps the battery perform at its best.
Quick Tip: A few minutes of upkeep every season can keep your garage door opener dependable and your battery lasting longer.
Why Isn’t My Remote Working Even After Changing the Battery?
Changing the battery usually solves the problem, but sometimes the issue runs deeper. If your garage door remote still won’t respond, here are a few possible reasons:
1. Misaligned Sensors
Your garage door sensors need to face each other properly to register the signal. Even a slight misalignment can prevent the door from moving. A quick adjustment often fixes this.
2. Remote or Opener Problems
If the remote is still unresponsive, the problem may be inside the remote itself or the opener unit. In this case, it’s best to have a garage door technician inspect the system.
3. Signal Interference
Other electronic devices in your home can sometimes block or weaken the signal from your remote. Try using the remote closer to the opener to see if it makes a difference.
4. Worn or Damaged Parts
If your rollers, cables, or even panels are worn out, the entire system may struggle to work properly. Replacing these parts can restore smooth operation.
If you’ve checked these issues and the remote still doesn’t work, don’t waste time feeling stuck. Reach out to the professionals at Upstate Doors. Our team can quickly diagnose the problem and get your garage door opener working again.
When to Consult a Professional
Changing a battery is simple, but not every garage door problem has an easy fix. Some situations call for professional help to keep your system safe and reliable.
Persistent Electrical Issues
If the opener keeps acting up even after you replace the battery, something deeper may be wrong. Electrical problems can get tricky fast, and a trained technician can track down the root cause.
Damaged Remotes or Keypads
Dropped your remote in water? Notice cracks, dents, or heavy corrosion? These issues usually go beyond a quick fix. A pro can decide whether repair makes sense or if replacement is the smarter option.
Complicated Error Codes
Many modern openers flash error lights or display codes. These signals can point to trouble with the motor, sensors, or drive system. Instead of guessing, let a professional read and resolve the problem.
Spring or Cable Safety Risks
Replacing a battery is safe, but handling torsion springs, cables, or other heavy parts is dangerous. If your door is stuck, noisy, or out of balance, don’t try to fix it yourself.
Calling in expert support doesn’t just solve the problem. It also extends the life of your garage door and gives you peace of mind knowing everything works as it should.
Final Thoughts
Now that you know how to change the battery in your garage door opener, you can get your door working again without much hassle. It’s a small fix that makes a big difference.
Of course, not every garage door issue comes down to the battery. Sometimes the problem is a broken spring, dirty photo eyes, or another minor issue. Start by checking the basics. A quick inspection often reveals what’s wrong.
If the battery swap doesn’t solve it, don’t stress. That’s where we come in. At Upstate Doors, we help homeowners across Northern New York with reliable garage door repair and replacement.
Whether you need a quick repair, a full opener replacement, or just a professional opinion, our team is ready to help. Reach out today and let us take care of your garage door so it works smoothly again.
FAQs
Why Isn’t My Garage Door Opener Working After Replacing the Battery?
If your remote still doesn’t respond, double-check that the battery is in the correct position. Make sure the opener itself has power, then try syncing the remote again. If nothing works, the issue could be with the remote or the opener, and it may need repair.
How Often Should I Replace My Garage Door Opener Battery?
On average, a garage door opener battery lasts one to two years, depending on usage and the type of battery. Test your remote regularly so you know when it starts to weaken. Following a routine replacement schedule can save you from getting stuck outside your garage.
Do I Need to Reprogram My Remote After Replacing the Battery?
In most cases, you won’t have to. But sometimes the remote may lose its settings after a new battery is installed. If that happens, simply reprogram it by following the instructions in your garage door opener’s manual.